Wednesday, December 9, 2009

Two Tutorial Tuesday???

OH. MY. GOD.

Esme has learned how to add a video to her blog. It would appear, and you could look at this as another tutorial, that what you do is this.

  1. Find a video somewhere.
  2. Take this one for example, also from YouCanMakeThis.com:
  3. Select it (Esme found it easiest to select the last word before it and the first word after it and paste the whole thing, like this:

    Keep reading! :)
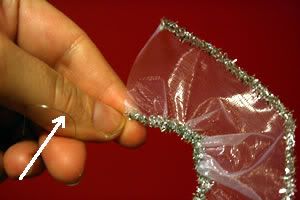
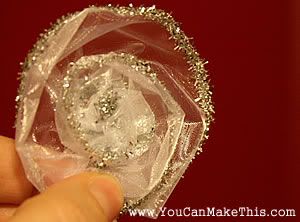
  4. Here’s a few more photos so you can see the details!

  5. Go to your blog, without stopping to copy something else on the way like Esme did the first time
  6. Open a new post
  7. Hit ctrl-v and by some miracle of nature the video will appear. Unless it doesn't and a bunch of letters and symbols show up instead. In that case, publish your post then look at it. You may be surprised to find that those letters and symbols have blossomed into a video!!! If, on the other hand, you find that the letters and symbols just made a mess, then you'll want to go to a blog where they know what they're doing because Esme just got lucky on this one...
ps: ignore that #4 next to the video. Esme still hasn't figure out how to avoid having new numbers pop up when she doesn't want them to, or how to eliminate them once they're there... Be patient. She'll catch on eventually.

pps: also, please ignore the fact that this post should really come after the other one. Why does the darned internet have to do everything backwards? Who thought that was a good idea? Al Gore?

Thanks again to YouCanMakeThis.com for their generosity! Now I've got to go find one of those craft store glass blocks so I can put a picture of my mother in it then fill it with rocks...


Learn fun and easy gift-giving ideas you can make!

Did somebody say Tutorial Tuesday???

What better way to open a new Crafting Blog than with a FREE TUTORIAL!!! Naturally, it would be so much more dignified if Esme had taken the time to make her own darned tutorial, Esme is too disorganized even to take the time to put the little accent mark over the second "e" in her name - which is pronounced EZ-may, btw - so thanks to YouCanMakeThis.com for this one, part of their fabulous DIY Gift Giving Series. You'll want to swing by their website for other tutorials, including some spectacular videos that Esme hasn't figured out how to use yet. They also have about a bijillion downloadable patterns for clothing, jewelry, digital stuff, knitting, applique,... some are free while others cost a reasonable price considering how well done they are, with color pictures, detailed explanations and all. They're one of my favorite places to go to play makebelieve, as in makebelieve I have time to make all those things!

Here's the tutorial, as promised. Enjoy!

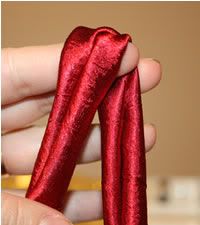
Good Monday morning! Are you ready to start a fun project this week? Here’s one I think you’re going to love because it takes minimal materials and time, yet has fantastic results!
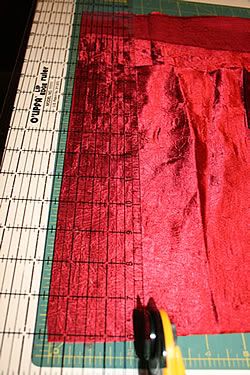
I had the opportunity to show how to make these on NBC/KSL’s Studio5 program today! Check out the video below! We also including the step-by-step photos on how these trendy (and oh-so-cute!) necklaces and bracelets were put together!

Materials Needed:

  • 1/8 yard fabric
  • wood beads or marbles
  • large safety pin & a straight pin
  • sewing machine
  • wire-trimmed ribbon (optional flower)
  • toggle (optional)

Step 1: Measure around your bead and add 1/2 inch. This will be the width of your fabric strip. Since my bead measured 2 inches around, I cut a fabric strip 2 1/2″ x the length of the fabric (45″).

Step 2: Right sides together, sew a 1/4 inch seam along the long side of fabric. Do not sew the short ends at this time. You are doing this in order to form a tube.

Step 3: Attach a large safety pin to end of tube in order to turn the tube right-side-out.

Step 4: Find the middle of your tube by folding it in half. Place a pin there.

Step 5: Insert a bead or marble into the tube. Push it through the tube until it stops at the straight pin.

Step 6: Tie a knot right next to the bead. Remove pin and tie a knot on the other side of the bead. This becomes your center bead and an equal number of beads will be placed on each side of that middle bead. Continue to tie a knot inbetween each bead.

Step 7: To finish the ends, simply tuck the raw edges inside of the tube and topstitch. I used a different colored thread just for clarity in the photos, but I’d suggest using the same color thread as your fabric.

Now, you can leave this as is…or…you can embellish it even more with a flower (or two!) Fabric flowers are so popular now. And while there are so many different ways to make them, I’m going to show you an extremely EASY way to do one from ribbon! And did I mention it is super cute?!? ;)

Here’s what you want to look for: wire-trimmed ribbon! You know the kind — you’ll find it all over the Christmas aisles of any store, as well as in the ribbon department.

All you need to do is pull the wire from one of the ends. See what happens? It starts to GATHER your ribbon! Of course, this is exactly what happens when you have a basting or gathering stitch along one side of fabric. But by using wire-trimmed ribbon, you save yourself a step! (I always love that!)

Keep tugging and watch that ribbon ruffle! Then take a needle and thread and sew the layers together (a little dab of hot glue works, too!)

Here are some more photos of what we did with ribbon flowers! We used the same gathering technique on fabric, tulle, mesh, and more. Plus, take a look at some variations that 2 of our team members, Sherrie and Rachel, created with this simple necklace technique!

Have fun!

Learn fun and easy gift-giving ideas you can make!

Saturday, September 12, 2009

PUEBLO PARTY LARIAT


A melange of semi-precious gemstone chips and shapes all got together to play ring around the rosie with the black onyx flower centerpiece. Leading the group is a faceted freeform pendant cut from a salmon colored mountain jade (dyed). Wear this necklace long and sultry, or double wrap it for a whole different look.

Gemstones include, among others, amethyst, red coral, turquoise, rhodonite, jade, and probably some agate. Some elements, primarily the turquoise and jade, may be dyed.

28" long, centerpiece measures 1 1/4"

ONE OF A KIND: $48.00


Pueblo Party Lariate, detail